Introduction
There are many reasons why you may want to use a brute-force method to discover web domains or sub-domains, for example reconnaissance or attack surface discovery.
Whilst Burp Suite can discover content in folders below a domain using a brute-force approach (see: here), it cannot use this approach to find domains.
Burp Intruder would be a possible tool for this (assuming you are looking for web sites) except that you have to specifically choose the target domain on the first tab so it cannot be chosen as a payload position which could then be brute-forced by Intruder. Once I realised this, I started thinking how I could use Burp’s features to enable this. I have set out the solution below. Note that this assumes you are already familiar with how Burp Suite works and it will only work with Burp Suite Pro.
Invisible Proxying
The answer is to create an invisible proxy in Burp. Invisible proxy is a way in which Burp handles client applications which cannot be specifically configured to use a proxy. As explained here https://portswigger.net/burp/help/proxy_options_invisible, applications which can be configured to use a proxy will send a full URL to the proxy so that the proxy knows where to send the request on to. An application, which cannot be configured to use a proxy will just include the URL in the path but not the domain itself.
Invisible proxy mode effectively means that Burp will decide on the target location to send the request based on the host header in the HTTP request. Now, the host header can be selected as a payload position in intruder and we can therefore fuzz that.
Configuring Burp Suite
Setting up the proxy
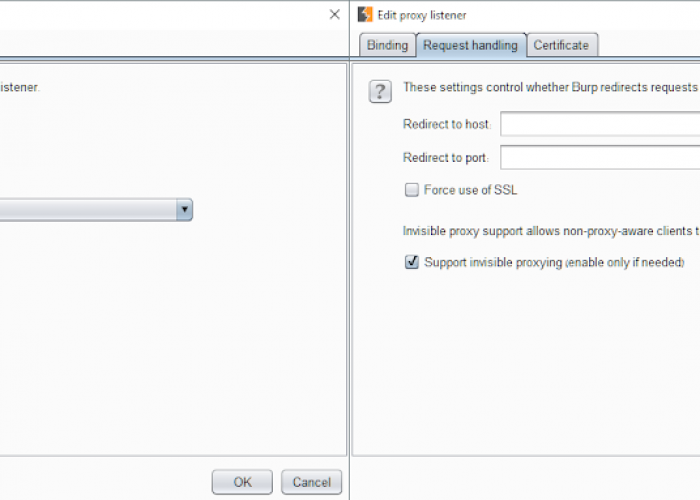
The first thing I have to do is setup a new proxy listener in Burp. In this case I have it listening on port 443 although actually you could choose any available port. The important thing here is that I have selected the invisible proxy option.
Setting up Intruder
I have already sent a standard GET request to intruder. I now go to the target tab and for the target I choose localhost and the port where I have got my invisible proxy listening, in this case 443.
I can see the standard GET request which I sent in the Positions tab and I can now select the part of the domain in the host header which I want to attack, II have just chosen one payload position but obviously I could choose multiple positions if I wanted attempt multiple types. You could also add a port onto the host header and choose that as a payload if you wanted to attempt multiple port types.
The rest is the same as a standard Intruder attack, in my case I have chosen a character brute-force payload but you will probably want to use a predefined list of likely domains.
Executing the attack
Intruder will give you an error about the target and host header not matching but you can ignore that
Reviewing the results
You can now go through the intruder results to look at what was returned.
Interestingly, because you are looping back through Burp’s proxy, you will also see the requests that were sent in the proxy history list.
I hope this little trick is useful. If you have any comments, critiques or suggestions, you can contact me using the details below.


